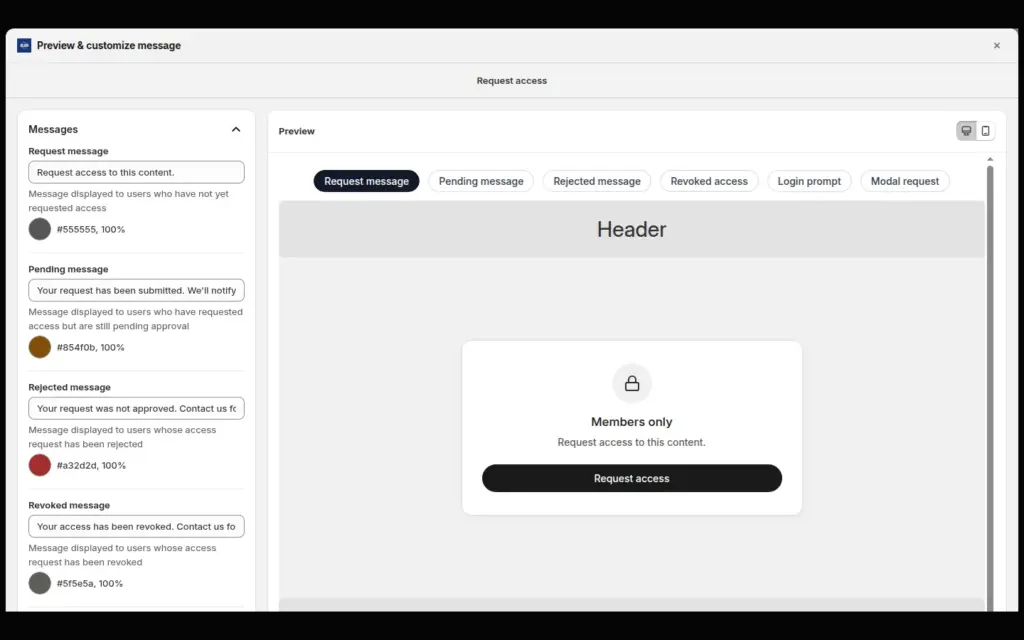
To add a Request access button to a locked Shopify page or price, create a lock in BSS B2B Lock and choose User type > Request access as the condition. Visitors sign in, click the button, send a short form, and you approve or reject each request from one list. The buyer gets an email with your decision.
This page is for wholesalers and brands that want to vet buyers before showing trade prices, but do not want to hand out passcodes or tag customers by hand. It covers the whole flow, what buyers see at each stage, the plan and account requirements, and the limits you should know before you rely on it.
Who this is for
Request access suits you if:
- You sell to licensed professionals, resellers or certified partners and want to check each one.
- Your locked pages or prices currently lead to a dead end, and serious buyers email your team or leave.
- You do not want to share one passcode that anyone can forward.
- You prefer a personal yes or no over a registration form that approves automatically.
- Your buyers already have customer accounts, or you are happy to ask them to create one first.
- You want a single list of everyone who asked for access, with a status for each.
Why this matters
A plain lock tells visitors “no” without telling them what to do next. Serious buyers email your team or leave, and you lose the chance to vet them in a structured way. Requests that arrive by email get lost between inboxes, and nobody can tell which ones were answered. A request flow keeps every application in one list, with a status, and tells the buyer what is happening.
The cost of a dead end is real for a professional brand. DermaplanePro, a skincare brand that sells to licensed professionals, built its wholesale process around strict buyer qualification, a locked B2B storefront and verified onboarding; read the DermaplanePro case study. The lesson for any brand with a vetted audience is the same: the less you rely on informal email, the faster you can say yes to a good buyer.
Picture a wholesaler of professional hair-care products that only sells to licensed stylists. A salon owner finds a product link in a search result, sees a message that prices are for approved professionals, clicks Request access, adds a line about their salon and waits. The team checks a licence number, approves the request, and the buyer sees prices on the next page load. Nobody had to pass a code around or tag a customer by hand.
What Shopify covers natively, and where an app helps
Shopify’s built-in B2B features, listed on the B2B features by plan page of the Help Center, are about companies, catalogs, payment terms and quantity rules. Hiding prices or pages from visitors until you approve them is not on that list; the pillar guide Shopify B2B makes the same point about hiding prices.
BSS B2B Lock adds a Request access condition to its locks. It works on the Online Store, for pages, content and prices you choose to lock. The access control hub compares it with passcodes, secret links, tags and login-only locks.
How to set it up with BSS B2B Lock
Before you start
Check three things. The BSS B2B Lock app embed is on in your current theme, customer accounts are enabled in Shopify so shoppers can log in, and your store sells through the Online Store channel. If you publish a new theme later, re-enable the app embed so your locks keep working.
1. Create a lock with the Request access condition
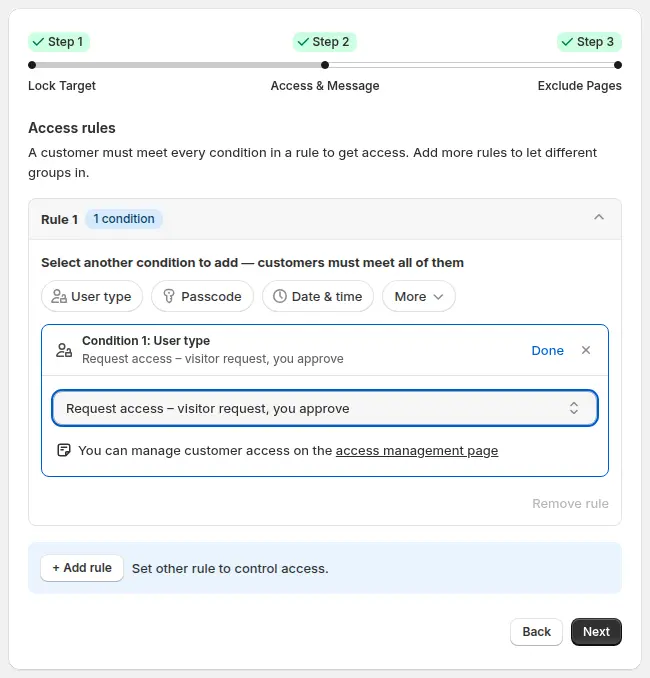
Open Locks > Add lock rule, choose Create my own lock, name it and pick what to protect: pages, content or prices. In Access & Message, click the User type chip in Rule 1 and select Request access: visitor request, you approve.
2. Customize every message
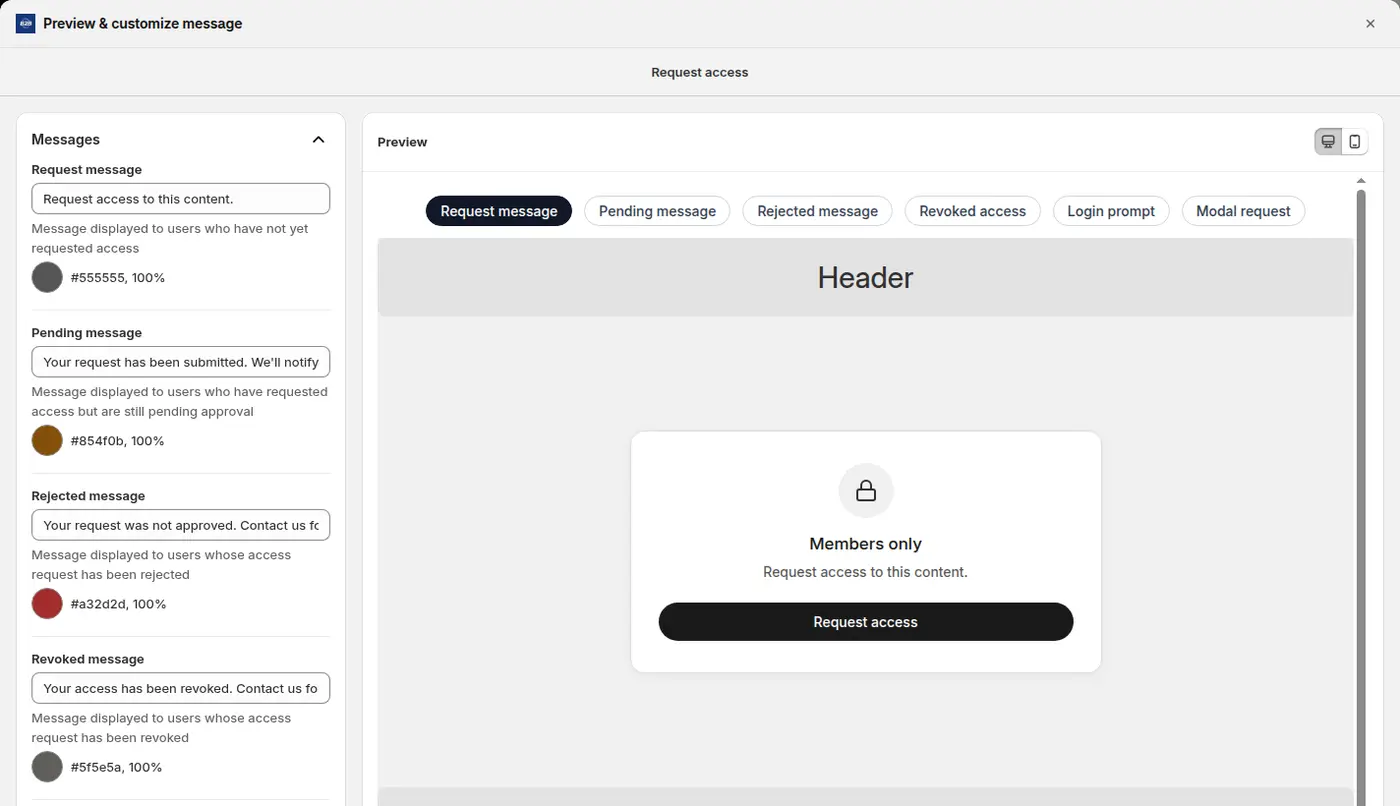
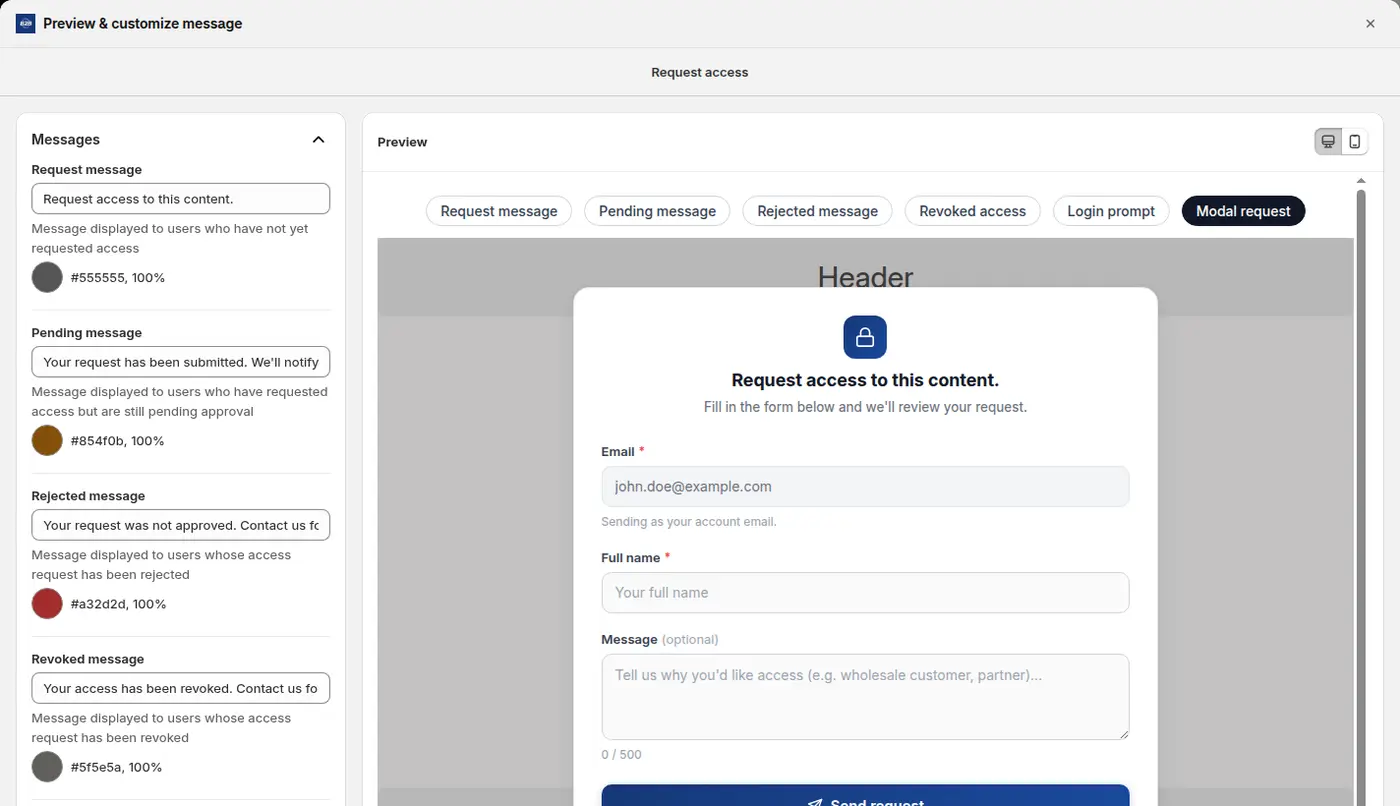
Use the Preview card to edit the messages buyers see: the request message with its button, the pending message, the rejected message, the revoked message and the login prompt. A request message written like an invitation, for example “Wholesale prices are available for registered partners, request access below”, works better than a flat “Access denied”. Say in the message what to include, such as a company name or a short note about the business.
3. Know what the buyer sees
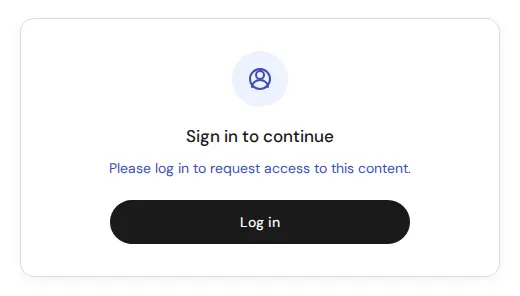
A buyer who is not signed in sees a prompt to sign in first. A signed-in buyer clicks the button and fills in a short form; the email comes from their account, and they add a name and an optional note.
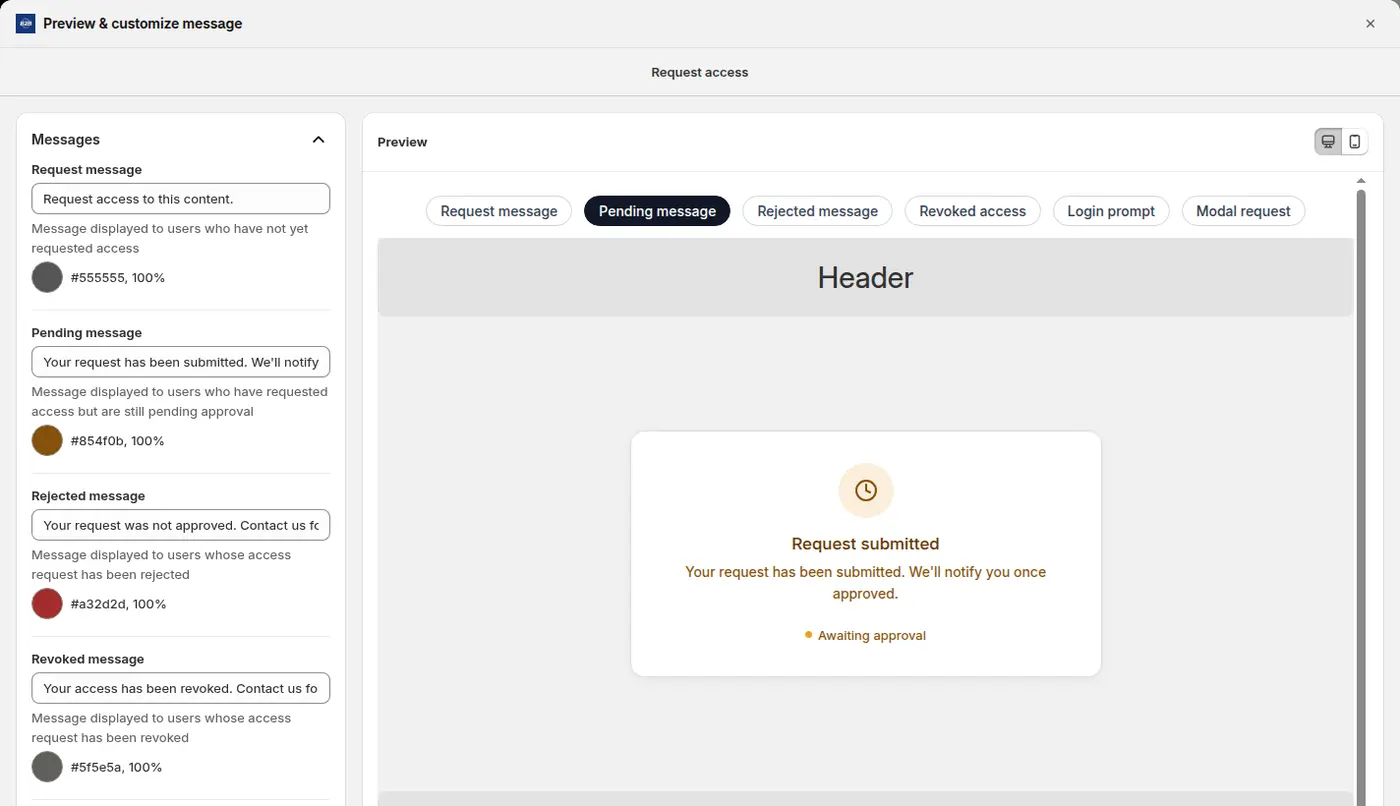
After sending the request, the buyer sees the pending message until you decide.
4. Review and decide in Customer Access Requests
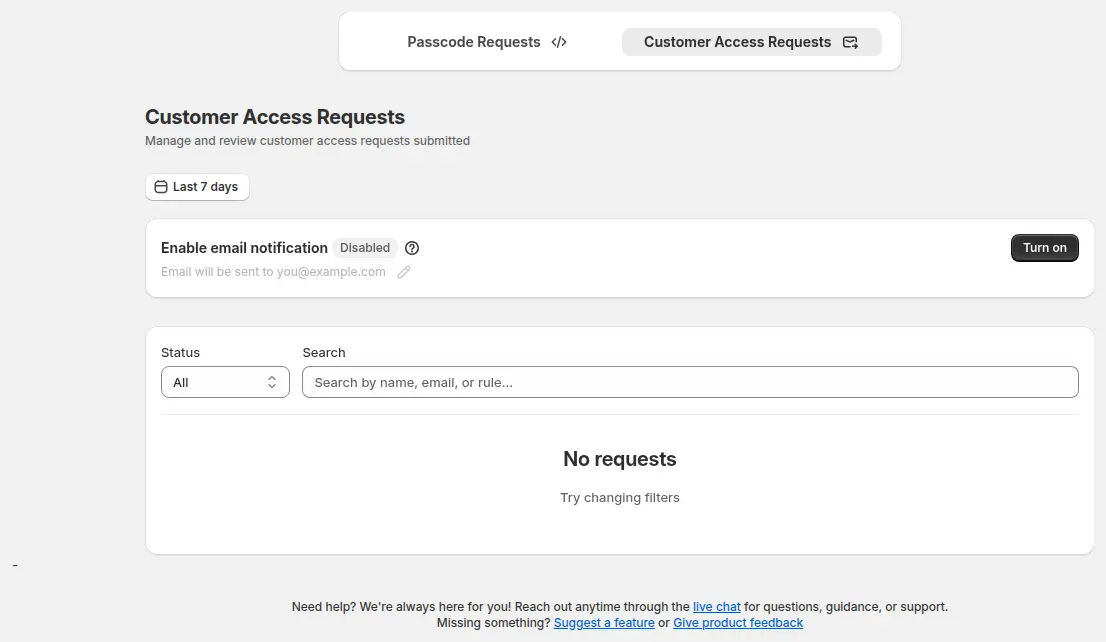
Open the access management page and the Customer Access Requests tab, next to Passcode Requests. Turn on Enable email notification and set the address that should receive alerts. Filter by status, or search by name, email or rule. Approve a request with the check mark, reject it with the cross, open the eye icon to read the buyer’s message, or revoke access later. When you approve, the buyer receives an email.
5. Test it end to end
Open the store in a private window and go to a locked page. You should see the login prompt. Sign in with a test customer account, click Request access, check that the pending message appears and that you receive the notification email. Approve the test request in the app, then refresh the storefront. Approval syncs through a queue, so allow a short delay.
Example
Example for illustration only, not a customer result. A hair-care wholesaler locks its prices with a Request access rule. In one week 14 visitors request access. The team opens Customer Access Requests, filters by pending, and reads each note. Ten include a salon name and a licence number that checks out and are approved; three have no business details and are rejected, with a message that invites them to resubmit; one is a retail customer and is ignored for now. The ten approved buyers each receive an email, and prices appear on their next page load. A month later, one buyer closes their salon; the team opens the list and revokes that buyer’s access, which takes effect the next time they load the page.
Request access, registration form, passcode or tag?
The right gate depends on how much you want to vet and how much work you want to do per buyer.
| Option | Who decides | Needs an account | Best for |
|---|---|---|---|
| Request access | You, per request and per rule | Yes, logged in | Vetting buyers who already have accounts |
| Registration form with approval | You, per application | Created at approval | Onboarding new wholesale accounts with tags and prices |
| Passcode | Whoever knows the code | No | A small group you already trust |
| Customer tag | A tag added by you, a form or a rule | Yes | Ongoing access for approved wholesale buyers |
Many stores combine two of them. A common pattern is a registration form for new businesses, which tags approved buyers for pricing, plus Request access for a specific locked area, such as a restricted product line, that only some approved buyers should see. Because approval is per rule, one buyer can be approved for the general catalog and still wait for the restricted line.
Writing the messages
Each message is a small piece of onboarding. Keep the request message to two or three lines: who the content is for, what you need from the buyer, and what happens next. In the pending message, say how long you usually take to reply, but only if you can keep that promise. In the rejected message, give a way to reach you, because some rejections are simply missing information. In the revoked message, be neutral and give a contact. You can set a text colour for each message to match your brand and preview every state on desktop and mobile before you save.
Works well with
- Secret link for a private collection when you want to share a page without accounts.
- Give B2B buyers access with a passcode for small groups who do not need accounts.
- Hide wholesale prices from guest visitors for the login-only version of price hiding.
- Wholesale registration form with approval when you want approved buyers to get tags and prices in BSS B2B Solution.
Key terms: gated catalog, hide price and customer tag.
Limits and common mistakes
- Buyers must have an account and be logged in. The request is tied to their account. If you want to grant access without a login, use a passcode lock instead.
- Approval does not add a customer tag. The app keeps its own list of approved, rejected and revoked customers for each rule. If you want a tag for pricing, add it in Shopify, or use registration forms and Auto Tags in BSS B2B Solution.
- Approval is per rule. A buyer approved for one rule still needs approval for other rules that use Request access. Use one rule for several pages or prices when one approval should cover them.
- Approval is not instant. It syncs through a queue, so tell your team to allow a short delay.
- Revoking applies on the next page load. The buyer then sees your revoked message.
- Big lists. Each rule comfortably supports thousands of approved customers. If you expect 5,000 or more on one rule, contact support first.
- Locking pages, content or prices needs a paid plan. The Free plan covers the Entire store lock only, so check the plan details in the app before you build a Request access rule.
Setup checklist
- Enable the BSS B2B Lock app embed and customer accounts in Shopify.
- Create the lock and choose User type > Request access.
- Edit the request, pending, rejected, revoked and login messages.
- Turn on email notification and set the address that receives alerts.
- Decide who reviews requests and how quickly you will answer.
- Test with a private window and a test account, from request to approval.
- Keep your registration page reachable for buyers who have no account yet.
- Read the Request Access guide for every setting.
Plans and requirements
BSS B2B Lock has a Free plan that covers the Entire store lock and paid plans from $9.99 per month that unlock the page, content and price targets, with a 7-day trial on paid plans. The price steps up with your store’s Shopify plan; see the pricing page. To tag approved buyers and apply wholesale prices, add BSS B2B Solution.