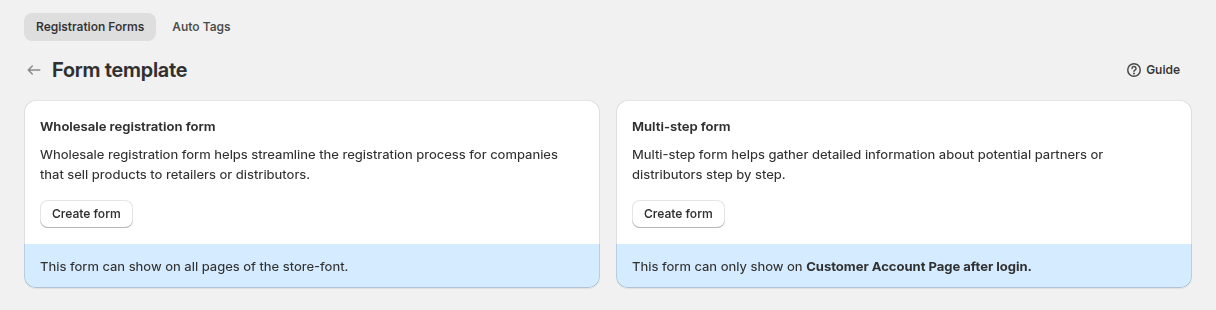
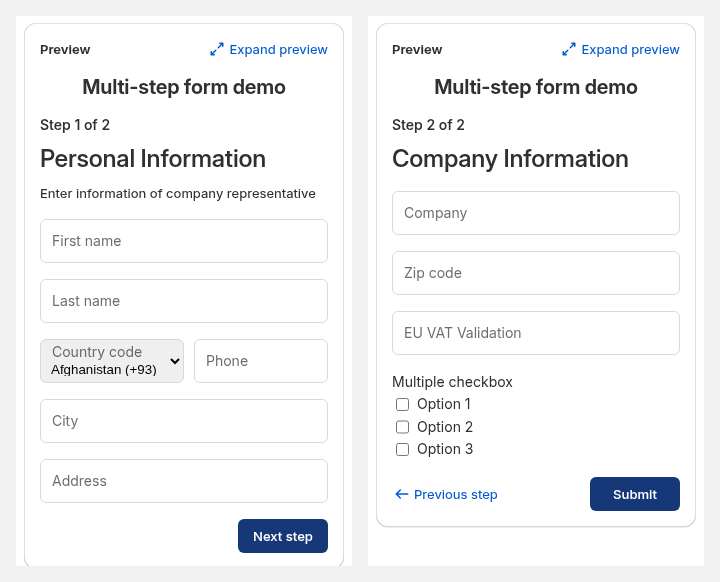
A multi-step wholesale application form splits a long registration into short steps, such as personal details first and company details second, with Next, Previous and Submit buttons. In BSS B2B Solution you create a Multi-step form, give each step a title and description, and publish it on the customer account page of Shopify’s new customer accounts, where applicants complete it after signing in.
A long application scares applicants away. One page with a dozen fields, a certificate upload and a tax ID looks like a chore, and serious buyers abandon it. The same questions, grouped into two or three steps, feel manageable, and you still receive one complete record per applicant for review.
Who this is for
A multi-step form fits you when:
- Your application asks for a lot of information, such as company details, contact data, tax documents and consent.
- Your store uses Shopify’s new customer accounts, where customers sign in with a one-time code.
- You want applicants who log in first to complete their wholesale details inside the account area.
- You want to group questions by topic, so your own review is faster too.
- You are on a paid plan, because multi-step forms are not available on Free.
Why this matters
Short steps feel easier. Each step can carry a title and a description that tells applicants what you need and why, which sets expectations before they start typing. Grouping fields by topic also helps your reviewers, because identity, business details and documents sit in clear blocks in the record.
A good split is identity and contact first, business details second, and documents and consent last. Lift-Spares, a Swedish supplier for elevator and escalator maintenance companies, describes in its case study how it redesigned wholesale registration so that qualification happened at entry, capturing the required business information upfront and routing approvals through a consistent flow, which let the team spend less time double-checking paperwork. Read the Lift-Spares story.
New customer accounts also change the journey. As the BSS user guide explains, new customer accounts let customers log in with a code, and a multi-step form can then be shown on the customer account page. A multi-step form is the format that fits this: it captures both journeys, customers who submit the form first and customers who log in first and complete their wholesale details later.
What Shopify covers natively, and where an app helps
Registration and approval are not listed in Shopify’s B2B plan features, according to the Shopify Help Center (read on 2026-10-02). Our Shopify B2B guide covers what native B2B does after you have set up a company. The multi-step form is part of the application stage that BSS B2B Solution adds. See the customer onboarding hub for the surrounding guides.
How to set up a multi-step form with BSS B2B Solution
Step 1: Create the form and choose the type
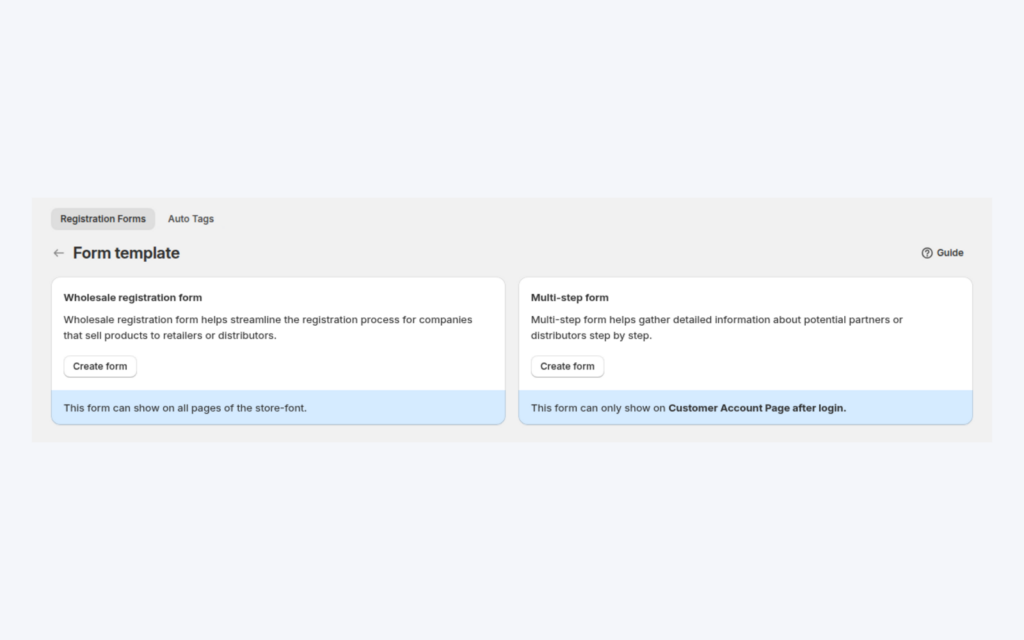
Go to B2B customers > Registration Forms, switch the module on and click Create form. Choose Multi-step form. The editor has four steps: Basics, Form Editor, Settings and Publish, and each step is checked before you can continue.
Step 2: Name the form
In Basics, enter a unique form name and set the status. The form ID shown here is the one you will use when you publish.
Step 3: Organise the steps
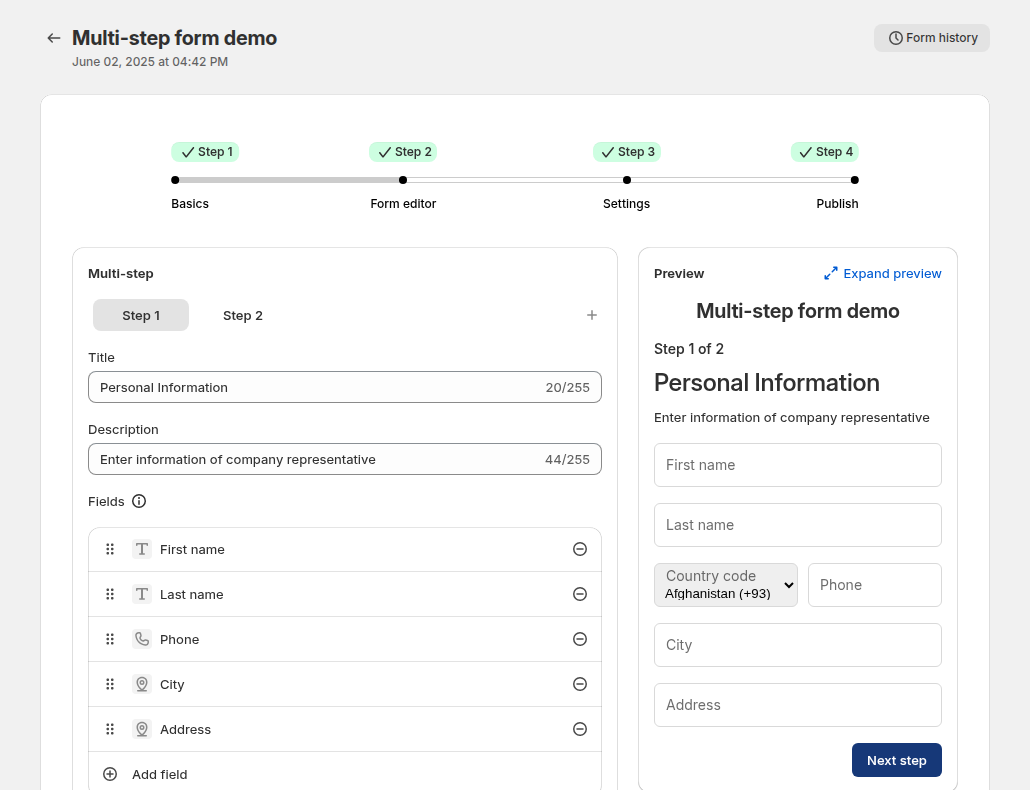
In Form Editor, click Add step for each stage. Give every step a title and a description, and add its fields: company details, contact information, tax documents and so on. The preview panel on the right shows how each step looks and works for the applicant.
Step 4: Set approval, tags and consent
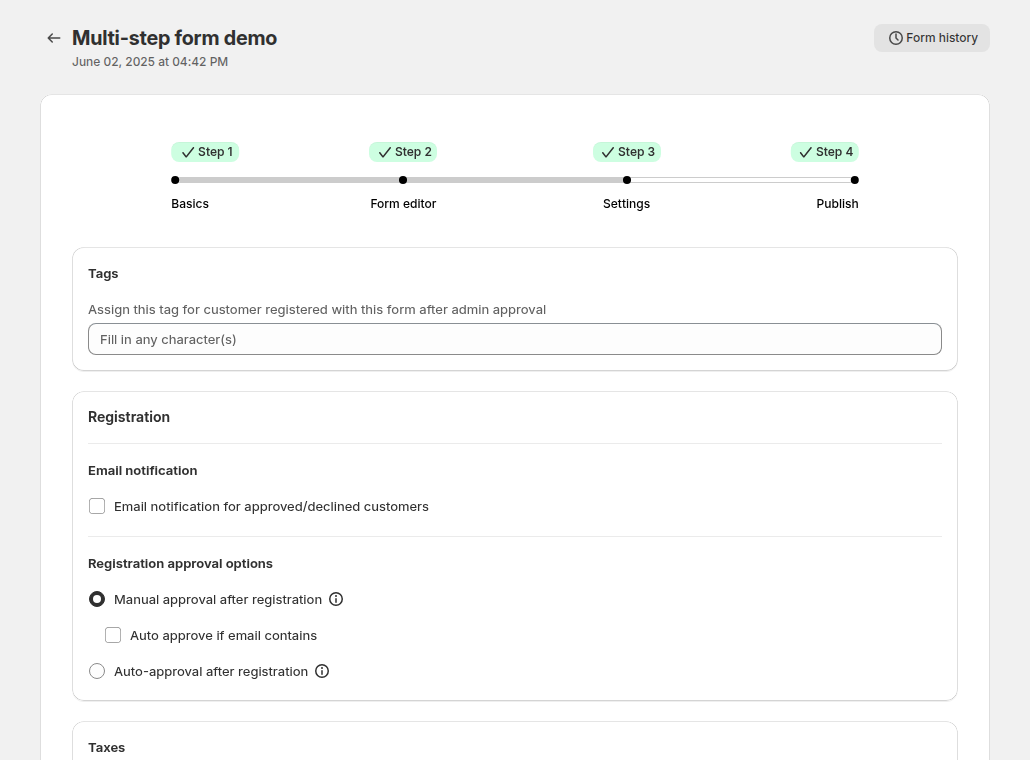
In Settings, enter the tag to assign when a customer is approved, for example wholesale. Choose Auto-approval after registration, Manual approval after registration, or manual approval with Auto approve if email contains for a trusted domain. Turn on email notifications, and, if needed, the privacy policy consent checkbox, which is added to the last step by default.
Step 5: Publish to the customer account page
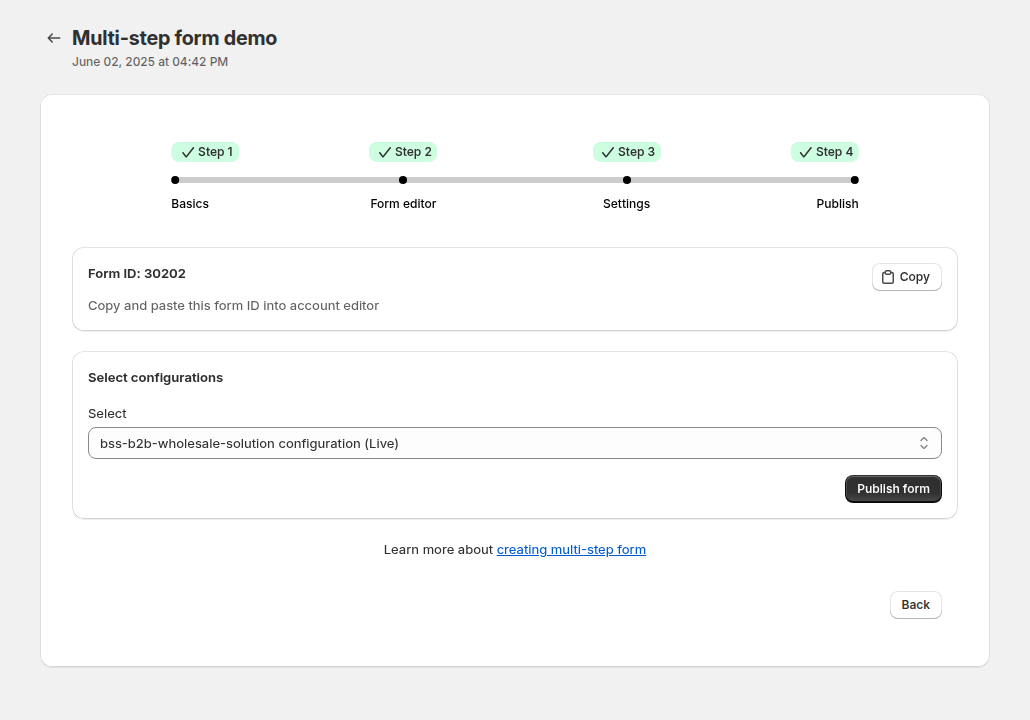
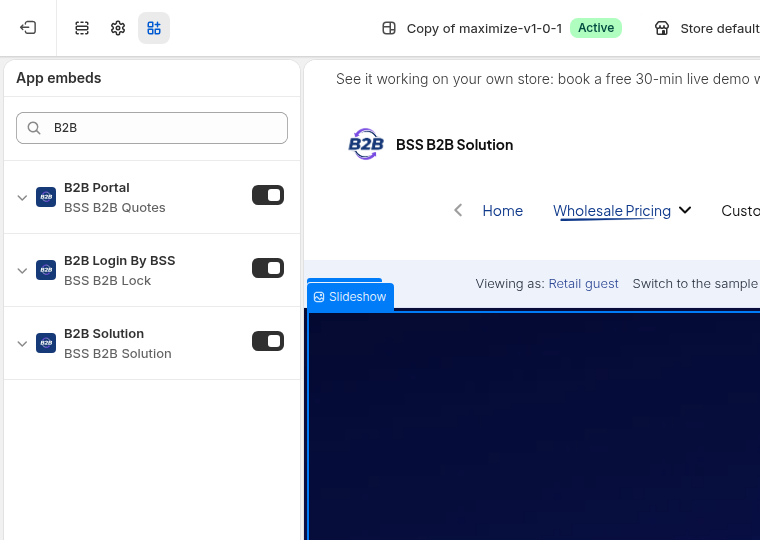
Check that the B2B Solution app embed is on in your theme, then open the Publish step. Copy the form ID into the customer account page editor and publish the form to a configuration, so the form shows in the account area.
Step 6: Test as an applicant
Sign in as a new customer with the one-time code, complete each step, submit, and then review the record in Registration management. Check the tag, the email and the pricing after approval.
Single-step or multi-step?
The two form types share the editor, the approval options and the tag on approval. They differ in where they run and what they need.
| Wholesale registration form | Multi-step form | |
|---|---|---|
| Where it shows | Any storefront page, through its own page or the app block | The customer account page |
| Customer accounts | Works with classic accounts; new accounts need the form on its own page | Shopify’s new customer accounts only |
| A field in the form | Taken from the sign-in, not a field | |
| Plan | One form on Free, more on paid plans | Paid plan |
Pick the single-step form if your store still uses classic accounts, or if you want applicants to apply before they have an account. Pick the multi-step form if you use new customer accounts and your application is long enough to benefit from steps.
Designing the steps
Write the step titles as promises, such as “Your contact details” and “About your business”, and use the description to say how long the step is and why you ask. Put the easiest questions first, so applicants commit before they reach the harder ones. Keep documents and consent for the last step, since an upload is the question most likely to make someone leave and come back later.
Count the fields per step. Four to six fields per step usually read well on a phone. If one step is much longer than the others, move a topic to its own step. Finally, read the form as an applicant, from the first sign-in to the confirmation message, and check that the wording of the after-registration message tells people what happens next and when they can expect an answer.
Example: a trade supplier with three steps
This is an illustration with made-up details, not a customer result. A supplier of cleaning products to hotels designs a three-step form.
| Step | Title | Fields |
|---|---|---|
| 1 | Contact | First name, last name, phone |
| 2 | Company | Company name, address, business type (dropdown), tax ID |
| 3 | Documents | Upload: business registration; privacy consent checkbox |
The applicant does not enter an email, because it comes from the code sign-in. At the end they see one Submit button, and the reviewer receives a single record with every answer. With manual approval the supplier checks the tax ID and the document, approves, and the applicant gets the hotel tag, which a Price List rule for that tag reads.
Works well with
- Single-step forms. A standard wholesale registration form with approval is the choice for classic customer accounts.
- Conditional logic. See conditional logic and document upload for forms that react to answers.
- Tax IDs. Verify a business tax ID at registration covers the validation fields.
- Pricing. Wholesale price by customer tag uses the tag that approval adds.
The glossary explains trade account, customer tag and tax ID.
Limits and common mistakes
- New customer accounts only. Multi-step forms work only with Shopify’s new customer accounts. Stores on classic accounts use the single-step form.
- A paid plan is required. They are not available on the Free plan, which allows one standard form.
- The email is not a field. Applicants sign in with a one-time code first, and, according to the user guide, the email comes from that sign-in, so do not add it to a step.
- Do not rely on login alone for prices. With new customer accounts anyone can log in, so give wholesale prices by tag after approval, not to every logged-in customer.
- The app embed must be on, or the form does not render.
- The same email cannot apply twice. A second submission with an email that already has a record is blocked, whatever its status.
- Test on mobile. Check that each step fits a phone screen before you publish.
Setup checklist
- Confirm the store uses new customer accounts and a paid plan.
- Group your questions into two or three steps with clear titles.
- Create the form and fill in each step and its description.
- Set the approval mode, the tag and the notifications.
- Turn on the app embed and publish the form to the account page.
- Complete a test application on a phone and on a computer.
- Approve it and check the tag, the email and the price.
Plans and requirements
Multi-step forms need a paid plan, and the user guide names Essentials or higher. The Free plan allows one standard form. Auto-approval, reCAPTCHA and some tax ID fields also depend on the plan, and conditional logic runs on Platinum. See the BSS B2B Solutions pricing page for current plan details.
You can install BSS B2B Solution from the Shopify App Store (4.9 rating from 1,185 reviews as of 2026-10-02, 14-day free trial on paid plans), read the app overview, or follow the guide to set up a multi-step registration form in the docs. The guide on Shopify new customer accounts explains the account journey.